
The knee articulation
14th. July 2005
The articulation at the knee is formed by the central pivot of the poleyn onto which are directly articulated lames above and below. Earlier armour often exhibited two lames either side of the poleyn, as was the case in Project 1. As time progressed into the 16th. century these reduced to a single lame above and below the poleyn, as exemplified in Project 2. Although it was common to see the two lame design in the 15th. century, the particular armour I am using as a base for this design has the more simple single lame articulation - and so that is what I am reproducing here.
This form of articulation, where the pieces are riveted directly to each other is known as shell articulation and began to make it's appearance towards the latter part of the 14th. century. Prior to this joints were constructed by either lacing the sections together with leather thongs or riveting the component parts of the joint to leather straps running on the inner aspect of the joint. This is known as floating articulation and is the method I intend to follow for the elbow at a later stage in the construction.
Essentially the design is the same as in Project 2, so forgive me if there is a degree of repetition. The first image, Fig. 35, shows the component parts cut out ready for shaping.
First a curve is imparted to the lames by dishing into the depressions on the stump using the rawhide hammer. The piece is first worked into the shallow depression and then a more pronounced curvature produced by working into the intermediate depression ( Figs. 36 & 37 ). The upper lame is curved to fit accurately over the base of the cuissart and a similar curve is formed in the lower lame.
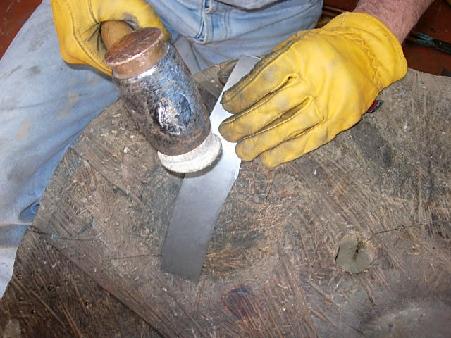
Next work is commenced on the poleyn. Initially this is shaped into the shallow depression on the stump using the rawhide hammer. The dishing is carried out over the entire piece except the wing of the genouillière ( Fig. 38 ).

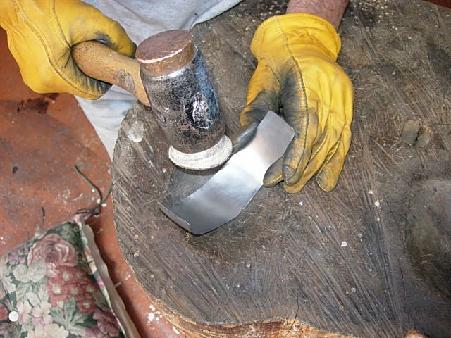
A deeper doming is now carried out, again using the rawhide hammer, into the intermediate depth depression on the stump. The hammer-work here is resticted to a circular area in the centre of the poleyn - as can be seen in the next image, Fig. 39.

The heavy dishing of the centre of the poleyn is next carried out using the large ball-ended hammer into the deepest depression carved into the stump. Fig. 40 shows the concentric rings marked over the area to be worked which act as a guide for the hammer.

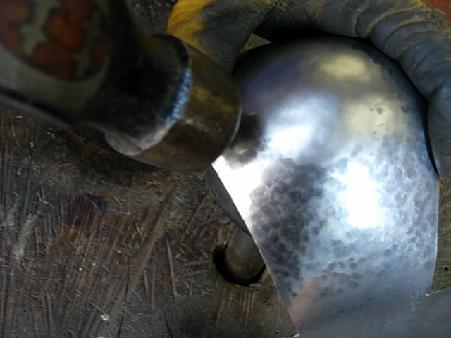
The hammer-work commences along the outer ring moving concentrically in towards the centre, with the hammer blows becoming progressively harder, stretching and pushing the metal down into the depression. The hammer-work on the perimeter serves only to keep the edges from buckling and is kept light so as not to stretch the metal here.
Finally the hammer-marks produced in the previous stage are removed by careful planishing over the steel ball. The polished flat face of the heavy hammer is used, working on the outside of the piece. I now tend to use much lighter blows when planishing than was previously the case - just sufficient to conform the curvature smoothly to the contour of the steel ball without marking the metal too much. This produces a much smoother effect with less thinning of the metal, and the resultant piece requires much less time spent finishing. In the previous two projects I have started planishing from the centre of the piece, working outwards. Here I have started at the periphery working concentrically inwards. This has allowed me to produce a curvature somewhat more pronounced than that of the ball itself ( Fig. 41 ).
With the hammer-work complete the pieces are now articulated and attached to the base of the cuissart. The first step in the articulation is to mark the rivet holes in the upper section of the top lame and the four holes in the poleyn. These are punched out of the cardboard patterns and transferred to the metal so they will be in the same position in both left and right knee articulations. It is important to get the placement of the rivets opposite each other so the joint will flex freely.
The top lame is then held in place over the base of the cuissart and the position of the holes in the cuissart marked. I find it is much easier to get the rivet-holes positioned accurately if someone else is available to use the marker pen whilst I am holding the piece in place. The top lame is next fixed to the cuissart using 'pop' rivets and the holes in the lower section of this lame marked - holding the poleyn in place. This is fixed and the process repeated for the bottom lame. Fig. 42 shows the completed articulation temporarily riveted - note the centre line drawn vertically down each piece to act as a guide in the positioning.

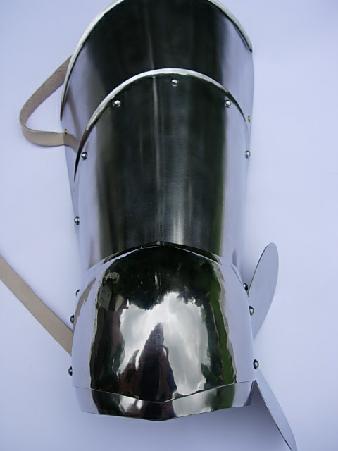
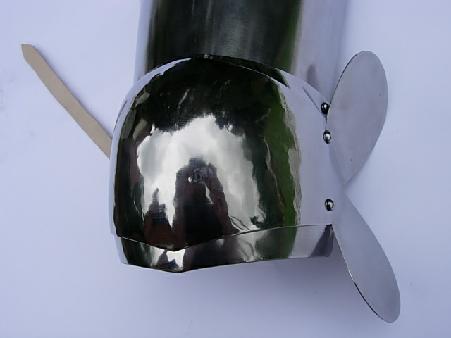
The aluminium rivets are now quickly drilled out and the pieces sanded and polished ready for final articulation using the round-head steel rivets. Fig. 43 shows the shell articulation from the inside after the strapwork has been added -

- and the final two images on this page ( Figs. 44 & 45 ) show the completed knee defense.
Because the hammer work in planishing was only very light, a minimal amount of sanding was necesary prior to polishing to produce this finish.
On the next page I will be making the lower leg defense - the greave or grevière.